Tag Archives: accessibility requirements

Complete TAS Project Submission

The fastest way to have your TAS review and inspection performed is to submit your project in one complete package. The TDLR requires us to have a complete submission prior to performing work. When all necessary forms and fees are received all together, this tremendously expedites our ability to complete a plan review and schedule/perform your inspection once construction is complete without delay. Seven items are required when submitting a project:

  1. TDLR Registration Confirmation Page; or a complete Registration Blank if Johnson Kelley is to register the project with the TDLR.
  2. Proof of Submission Form (POS) – This form is required to be completed by the Design Professional. The issued and submitted dates need to be completely filled in along with a signature of the Design Professional.
  3. Construction Documents (CDs) – One full set is required. Johnson Kelley accepts PDF copies of CDs and is preferred. Printed copies are also accepted. The TDLR requires documents submitted for TAS review within 20 working days of date issued for regulatory review (Permit).
  4. Fee Payment for Plan Review – An additional $200 should be added to the plan review fee if JohnsonKelley is to register the project with the TDLR ($175 State Fee + $25 JKA Service Fee). Our current plan review fee schedule is posted below.
  5. Fee Payment for Inspections – Johnson Kelley offers a 10% discount (JKA Fees Only. State Fees Do Not Apply) to the total cost of the project if prepayment of the Inspection and Travel Fees are submitted with the Plan Review Fees. Our current travel zone fee map is posted below.
  6. Owner’s Agent Designation Form (OAD) – Must be completed and signed by the Owner. This form is only required if the Owner is designating an Agent.
  7. Request for Inspection Form (RFI) – The TDLR requires the form to be signed by the Owner or Owners Agent and submitted to the RAS prior to the Inspection being scheduled. It should be noted that this form can be submitted at the time of plan review, or at any time up through when an inspection is needed. The sooner we get this form the better. We will hold the RFI until it is time to schedule your post construction inspection. Not receiving this form in a timely manner is the largest cause of delay to have your inspection scheduled and performed. The Owner or Owner’s Agent will be contacted prior to the inspection.

All the required forms are available on our website at www.johnsonkelley.com under the “Forms” tab or click here. We would also like to add that we offer a $10 gift card to your choice of Amazon, Starbucks, Regal Cinemas, Chili’s (Also good at Corner Bakery, Maggiano’s, Macaroni Grill, and On The Border), Walmart (Also good at Murphy Oil Fuel and Sam’s Club), or donated towards clean water wells in Cambodia with each Full Submission that includes all required forms and payment for fees.

Inquiries regarding billing and invoicing should be directed towards Kelly– Direct: 972-346-1942 or Email: khartman@johnsonkelley.com

If your project schedule and you need us to notify the TDLR of a new completion date, contact Steffanie- Direct: 972-346-1941 or Email: steffanie@johnsonkelley.com

Inquiries regarding project submission should be directed towards Project Registration and Submissions email: project.submit@johnsonkelley.com

Inquiries regarding inspection scheduling should be directed towards Janna – Direct: 972-346-1940 or Email: jballard@johnsonkelley.com

All inquiries regarding TAS technical questions should be directed towards Jeff, Mike, Michael, or Grant – Office: 972-422-5384

JKA logo name, wheelchair, words.1


Accessible Exercise Machines and Equipment – 2010 ADA/2012 TAS

The scope requires at least one of each type of exercise machine and equipment to comply with the 2010 Americans with Disabilities Act (ADA) / 2012 Texas Accessibility Standards (TAS). (See 236)

It can first be noted that exercise machines and equipment are not required to comply with some of the other accessible standards such as the operable parts operation and height requirements. Given their nature, exercise machines and equipment will not comply with grasping, pinching, twisting, or pushing/pulling force operation, as well as reach range height. In other words, the exercise machine or equipment itself is not regulated. (See 205 Ex.8)

Additionally, an exception for protruding objects in areas of sporting activity does not require exercise machines or equipment to comply with the requirements for a protruding object. (See 204 Ex.1)

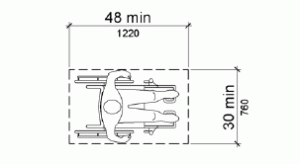
What exercise machines or equipment does call for is a clear floor space. A 30”x48” minimum clear floor space, connected to an accessible route, is required to be positioned for transfer or use by a person in a wheelchair. (See 1004 & 305)

Where exercise machines or equipment require transfer to operate, the clear floor space should be positioned where it allows for the best unobstructed transfer onto the machine.

Where exercise machines or equipment may be operated by a person in a wheelchair, a clear floor space centered on the operating mechanisms may be what best accommodates.

305_3


Figure 305.3 Clear Floor or Ground Space

JKA logo name, wheelchair, words.1


Essential for Quick Turnarounds on Plan Reviews

New plan review submissions that include all forms and payment typically have an expedited review.

Full submissions should include one printed set of the plans (signed & sealed), the registration confirmation page containing all project information or a completed registration blank if Johnson-Kelley will be registering the project, a completed and signed Proof of Submission form (including both Issued and Submitted dates),  and payment of the fees.

All forms, Fee Schedule, and Zone Map are available on our website at www.johnsonkelley.com or click here.

Submissions without plans, paperwork or payment will be considered incomplete and delay the start of the plan review.

JKA logo name, wheelchair, words.1

Accessible Toilet Grab Bar Spacing – 2010 ADA / 2012 TAS

Something to keep in mind when locating and installing “associated” dispensers, small purse shelves, or sanitary napkin disposals for accessible toilets, is the required spacing for the grab bars.

While all of these elements have specific technical requirements for where they can be located, it does not directly mention their proximity to grab bars.

The most common location we see for placement of these accessible elements is the side wall perpendicular to the toilet.

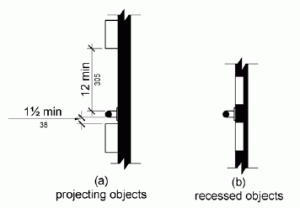
TAS requires that any projecting object above grab bars have at least 12” minimum of space between it and the object. Additionally, any projecting object below grab bars must have at least 1 ½” minimum of space between it and the object.

grab bar spacing


Figure 609.3 Spacing of Grab Bars

JKA logo name, wheelchair, words.1


Vision Windows and Viewing Panels on Doors – 2012 TAS / 2010 ADA

All doors on an accessible route, or within employee circulation paths (unless exempt by 206.2.8), are required to comply with 404 Doors.

The code calls for doors with vision lights, viewing panels, peep holes, windows, etc., to have the bottom edge measuring 43” maximum above the finished floor.

It should be taken into consideration that most doors are located ½”-1” above the finished floor because of either a raised threshold or the undercut of the door. Therefore, if a door is designed to have the bottom edge of the viewing panel to measure 43” from the bottom of the door, but the door is installed over a ½” raised threshold, the viewing panel will be too high.

It is required that vision lights be located relative to the finished floor, not the bottom of the door.

JKA logo name, wheelchair, words.1

Accessible Dining under the 2012 TAS / 2010 ADA

Determining how to provide for accessible dining can be tricky. It is important to keep in mind that when calculating the total number of accessible seating required for a given space, the 2012 Texas Accessibility Standards (TAS) only apply to fixed or built in dining surfaces i.e. bars, tables, countertops, drink rails, etc. Additionally, it is not acceptable to provide “adaptable” seating arrangements to make up for non-accessible fixed dining elements. For example; a movable table in a restaurant bar area cannot be counted as an accessible dining surface in lieu of the built-in high top bar.

Fixed dining surfaces, intended for the consumption of food or drink, are required to have 5% of the seating at each kind to be accessible, and dispersed throughout the facility. So, if a restaurant has 3 dining areas (one elevated, one bar section, and one outdoor area) each area is required to provide accessible portions, where fixed or built in dining surfaces are provided. Another example: Say a restaurant has a bar top that provides indoor/outdoor seating, where both areas are served from one common bar. Again, both the indoor and outdoor seating areas are required to provide accessible portions.

Now that we know where accessible seating is required, how do we calculate it?

A restaurant or fast food chain that only provides standard tables or booths is quite easy. Just 5% of the seating at each kind of fixed table must accommodate for clear floor space, knee/toe clearance, and 34” maximum height above the floor to the top of the dining surface.

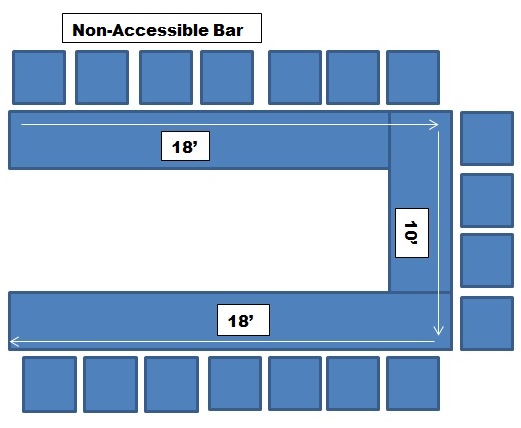
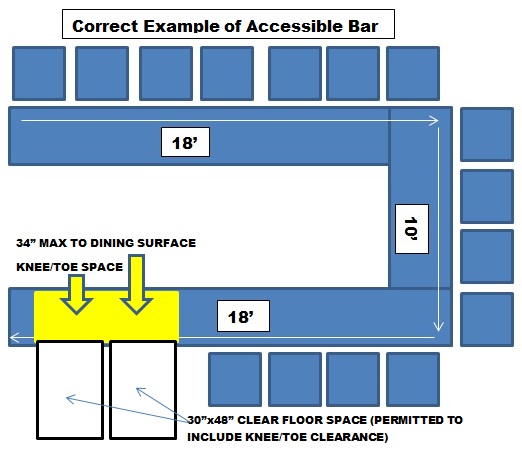
Calculating bars, drink rails, or fixed community style tables requires a little bit more thinking. These elements are based on linear feet, rather than total seating at fixed dining surfaces provided (e.g. the chairs in a dining area, or stools at a bar). For instance, if a bar has 3 sides to it with a total linear length of 46’, but provides 18 chairs, how many accessible spaces will you need? The non-accessible example below shows 18 bar stools (which would call for 1 space). However, the TDLR has determined that a measurement of 18” should be used to determine the total seating and standing space available at a dining surface. So, 46’ X 12” = 552” / 18” = 30.66 spaces X .05 = 1.53 spaces. 2012 TAS says that when calculating the number of accessible elements required, the next greater whole number should be used. Therefore, as shown in the correct example below, 2 spaces are required.

bar length


correct bar


JKA logo name, wheelchair, words.1


The Do’s and Don’ts of Accessible Toilet Grab Bars – Complying with 2010 ADA / 2012 TAS

More of the common errors we see during accessibility plan reviews and post construction inspections again occur in restrooms. Grab bars are elements of accessibility that have changed a bit between the 1994 Texas Accessibility Standards (TAS) and the new 2012 TAS*, leaving some confusion to their requirements.

The 1994 TAS used to call for all accessible toilet grab bars to measure 33” minimum to 36” maximum above the finished floor, to the centerline of the grab bar. This is no longer the case. The 2012 TAS* have changed to provide the same 33”-36” range, however, the measurement should be made to the top of the gripping surface. Construction tolerance is no longer an acceptable industry practice, and the ½” of error (if the bar is set 36” above the floor to the centerline) is considered a violation. Architects and engineers are encouraged to design the top of the grab bar to be placed somewhere in between the 33”-36” range. This will allow contractors a built in construction tolerance and give them a reasonable amount of room to install the grab bar to be compliant within the range.

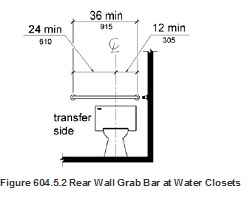
Another frequent mistake we come across is the location of the rear wall grab bar. Common practice to comply with the 1994 TAS was to place a 36” rear grab bar 6” off of the side wall. 2012 TAS* now calls for the placement of the rear grab bar to be located relative to the centerline of the toilet, requiring at least 12” of bar on the narrow side and 24” of bar on the open side of the toilet. With the new range of 16” – 18” for toilet centerline location under 2012 TAS*, care should be taken when installing the rear wall grab bar. The figure below comes from the 2012 TAS*.

*It can be noted that the 2010 Americans with Disabilities Act (ADA) and 2012 Texas Accessibility Standards (TAS) are considered equivalent for this particular technical section of the code.

rear wall grab bar location


JKA logo name, wheelchair, words.1


TAS / ADA Toilet Location – A common mistake made in Water Closets and Toilet Compartments

One of the most common errors we see when doing post construction inspections most likely occurs because of the change from 1994 Texas Accessibility Standards (TAS) to 2012 TAS.

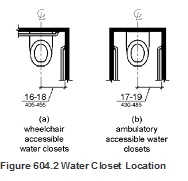
Here’s an example. The plans show a wheelchair accessible toilet centerline to be located 18” from the side wall or partition; however, when we are on the post construction inspection and bend down with our tape measure to take a look, the centerline is set at 19”, or even 18 ½”, and becomes a violation. So, why is this?

There was a change in the code.

The 1994 TAS used to call for all accessible toilet centerlines to be located precisely 18” from the side wall or partition. The catch is, “reasonable construction tolerance” was a normal practice during construction, given the nature of the work. In the beginning, it was common for the tolerance to range +/- 1” on either side of the 18” centerline. However, over the years, the range of tolerance became less and less to where most interpretations for “reasonable construction tolerance” was around +/- ½”, or even less to none.

Starting March 15th 2012, the 2012 TAS became effective. This called for all new construction, and renovations in which toilet fixtures are altered, to adhere to a new set of standards.

2012 TAS requires a wheelchair accessible toiletscenterline to measure 16” minimum to 18” maximum from the side wall or partition, with no construction tolerance outside of this range. Therefore, the 18 ½” becomes a violation.

Architects/Engineers are encouraged to design the toilet centerline to be 17″ from the side wall or partition. This will allow for built in construction tolerance within the 16″-18″ range, giving the contractor a reasonable +/- 1″ on either side of the 17″. The figure below comes from the 2012 TAS.

water closet location


JKA logo name, wheelchair, words.1


Weekly/Monthly Blogs and Technical Articles coming soon!

Here at Johnson Kelley, our job is to inform our clients, to help better understand and comply with Texas Accessibility Standards, under the TDLR Architectural Barriers Program. Whether you’re a small business owner, architect, contractor, or property manager, bridging the gap between TAS and real world application is our goal.

Between thousands of plan reviews and countless hours in the field, we come across similar situations that commonly occur, but could have been avoided. So, in order to hopefully save you some time and money, we have decided to begin posting regular blogs and technical articles on these common issues we encounter. The goal is to better explain what this (sometimes complex) code is saying, in hopes to alleviate some concerns you may have.

The blogs and technical articles will cover a variety of topics including: common mistakes and errors in plan reviews, common mistakes and errors during construction, more detailed explanations of “tricky” technical parts in the code, administrative rules and procedures, trending news and updates about TAS and/or ADA as related to architectural barriers, and more!

So stay tuned!

As always, we will still be readily available to help answer any technical questions or concerns you may have.

-The JohnsonKelley Team

JKA logo name, wheelchair, words.1