Monthly Archives: August 2014

Vision Windows and Viewing Panels on Doors – 2012 TAS / 2010 ADA

All doors on an accessible route, or within employee circulation paths (unless exempt by 206.2.8), are required to comply with 404 Doors.

The code calls for doors with vision lights, viewing panels, peep holes, windows, etc., to have the bottom edge measuring 43” maximum above the finished floor.

It should be taken into consideration that most doors are located ½”-1” above the finished floor because of either a raised threshold or the undercut of the door. Therefore, if a door is designed to have the bottom edge of the viewing panel to measure 43” from the bottom of the door, but the door is installed over a ½” raised threshold, the viewing panel will be too high.

It is required that vision lights be located relative to the finished floor, not the bottom of the door.

JKA logo name, wheelchair, words.1

Accessible Dining under the 2012 TAS / 2010 ADA

Determining how to provide for accessible dining can be tricky. It is important to keep in mind that when calculating the total number of accessible seating required for a given space, the 2012 Texas Accessibility Standards (TAS) only apply to fixed or built in dining surfaces i.e. bars, tables, countertops, drink rails, etc. Additionally, it is not acceptable to provide “adaptable” seating arrangements to make up for non-accessible fixed dining elements. For example; a movable table in a restaurant bar area cannot be counted as an accessible dining surface in lieu of the built-in high top bar.

Fixed dining surfaces, intended for the consumption of food or drink, are required to have 5% of the seating at each kind to be accessible, and dispersed throughout the facility. So, if a restaurant has 3 dining areas (one elevated, one bar section, and one outdoor area) each area is required to provide accessible portions, where fixed or built in dining surfaces are provided. Another example: Say a restaurant has a bar top that provides indoor/outdoor seating, where both areas are served from one common bar. Again, both the indoor and outdoor seating areas are required to provide accessible portions.

Now that we know where accessible seating is required, how do we calculate it?

A restaurant or fast food chain that only provides standard tables or booths is quite easy. Just 5% of the seating at each kind of fixed table must accommodate for clear floor space, knee/toe clearance, and 34” maximum height above the floor to the top of the dining surface.

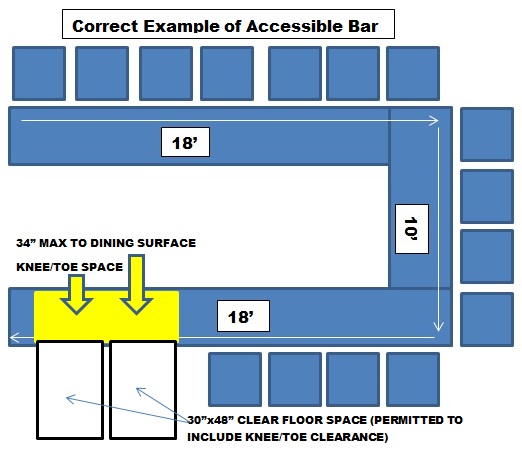
Calculating bars, drink rails, or fixed community style tables requires a little bit more thinking. These elements are based on linear feet, rather than total seating at fixed dining surfaces provided (e.g. the chairs in a dining area, or stools at a bar). For instance, if a bar has 3 sides to it with a total linear length of 46’, but provides 18 chairs, how many accessible spaces will you need? The non-accessible example below shows 18 bar stools (which would call for 1 space). However, the TDLR has determined that a measurement of 18” should be used to determine the total seating and standing space available at a dining surface. So, 46’ X 12” = 552” / 18” = 30.66 spaces X .05 = 1.53 spaces. 2012 TAS says that when calculating the number of accessible elements required, the next greater whole number should be used. Therefore, as shown in the correct example below, 2 spaces are required.

bar length


correct bar


JKA logo name, wheelchair, words.1


The Do’s and Don’ts of Accessible Toilet Grab Bars – Complying with 2010 ADA / 2012 TAS

More of the common errors we see during accessibility plan reviews and post construction inspections again occur in restrooms. Grab bars are elements of accessibility that have changed a bit between the 1994 Texas Accessibility Standards (TAS) and the new 2012 TAS*, leaving some confusion to their requirements.

The 1994 TAS used to call for all accessible toilet grab bars to measure 33” minimum to 36” maximum above the finished floor, to the centerline of the grab bar. This is no longer the case. The 2012 TAS* have changed to provide the same 33”-36” range, however, the measurement should be made to the top of the gripping surface. Construction tolerance is no longer an acceptable industry practice, and the ½” of error (if the bar is set 36” above the floor to the centerline) is considered a violation. Architects and engineers are encouraged to design the top of the grab bar to be placed somewhere in between the 33”-36” range. This will allow contractors a built in construction tolerance and give them a reasonable amount of room to install the grab bar to be compliant within the range.

Another frequent mistake we come across is the location of the rear wall grab bar. Common practice to comply with the 1994 TAS was to place a 36” rear grab bar 6” off of the side wall. 2012 TAS* now calls for the placement of the rear grab bar to be located relative to the centerline of the toilet, requiring at least 12” of bar on the narrow side and 24” of bar on the open side of the toilet. With the new range of 16” – 18” for toilet centerline location under 2012 TAS*, care should be taken when installing the rear wall grab bar. The figure below comes from the 2012 TAS*.

*It can be noted that the 2010 Americans with Disabilities Act (ADA) and 2012 Texas Accessibility Standards (TAS) are considered equivalent for this particular technical section of the code.

rear wall grab bar location


JKA logo name, wheelchair, words.1


TAS / ADA Toilet Location – A common mistake made in Water Closets and Toilet Compartments

One of the most common errors we see when doing post construction inspections most likely occurs because of the change from 1994 Texas Accessibility Standards (TAS) to 2012 TAS.

Here’s an example. The plans show a wheelchair accessible toilet centerline to be located 18” from the side wall or partition; however, when we are on the post construction inspection and bend down with our tape measure to take a look, the centerline is set at 19”, or even 18 ½”, and becomes a violation. So, why is this?

There was a change in the code.

The 1994 TAS used to call for all accessible toilet centerlines to be located precisely 18” from the side wall or partition. The catch is, “reasonable construction tolerance” was a normal practice during construction, given the nature of the work. In the beginning, it was common for the tolerance to range +/- 1” on either side of the 18” centerline. However, over the years, the range of tolerance became less and less to where most interpretations for “reasonable construction tolerance” was around +/- ½”, or even less to none.

Starting March 15th 2012, the 2012 TAS became effective. This called for all new construction, and renovations in which toilet fixtures are altered, to adhere to a new set of standards.

2012 TAS requires a wheelchair accessible toiletscenterline to measure 16” minimum to 18” maximum from the side wall or partition, with no construction tolerance outside of this range. Therefore, the 18 ½” becomes a violation.

Architects/Engineers are encouraged to design the toilet centerline to be 17″ from the side wall or partition. This will allow for built in construction tolerance within the 16″-18″ range, giving the contractor a reasonable +/- 1″ on either side of the 17″. The figure below comes from the 2012 TAS.

water closet location


JKA logo name, wheelchair, words.1